
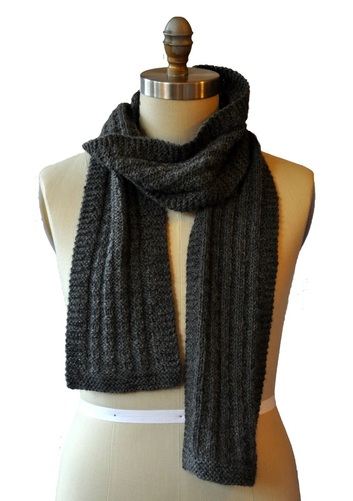
 I've just completed testing of this simple pattern designed for those who are newer to knitting and might want a more interesting pattern without feeling overwhelmed. The Franklin Scarf (named after my father) is just that type of project. For those who are a bit more advanced, this pattern becomes intuitive and is an easy one to carry around as "emergency knitting" or to take on car trips. Read about it HERE on Ravelry. Purchase the pattern there for $2.00. The Franklin scarf is named after my father, William Franklin Kunnecke, who believed in working hard, always doing your very best, and being generous enough to share your knowledge with others. My dad worked in construction, and I grew up around tools and sawdust. He taught me early on that shortcuts lead to a longer path and that almost always, the quickest way to get something done is to do it right the first time. It's a good lesson to learn and not always the easiest one to practice.
From my dad I also learned we can find the answer to almost any question if we take the time to research. He was an avid reader, could build (or fix) anything, and I have missed him every day since his death in 2007.
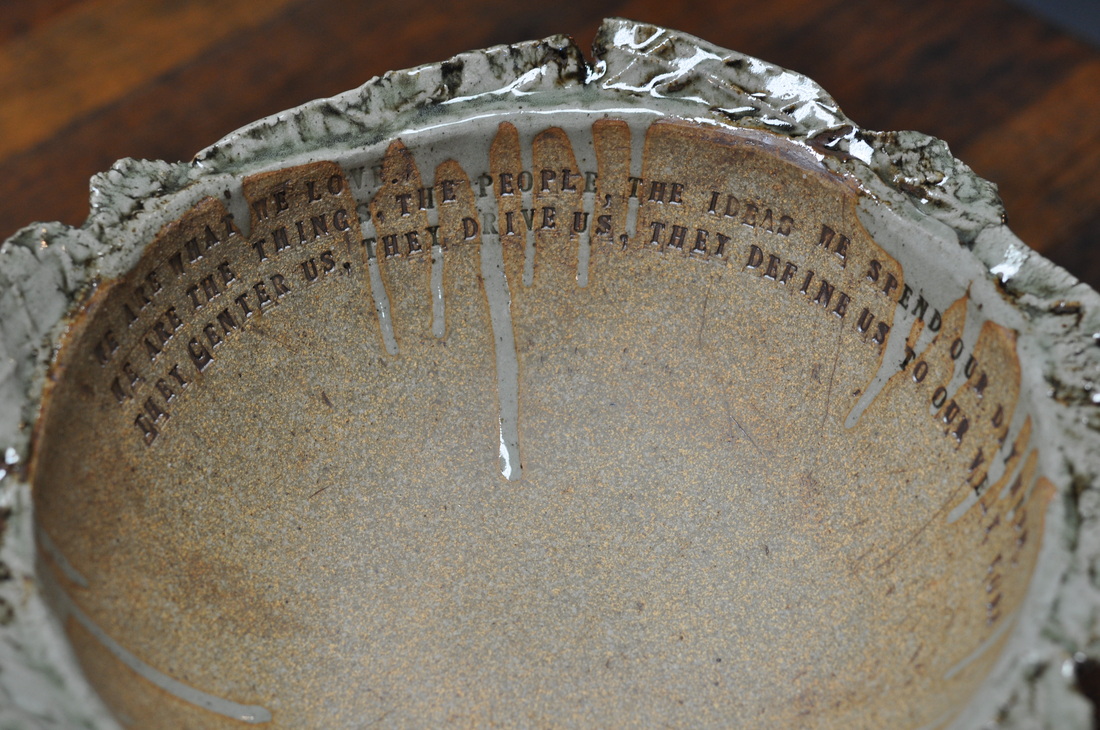
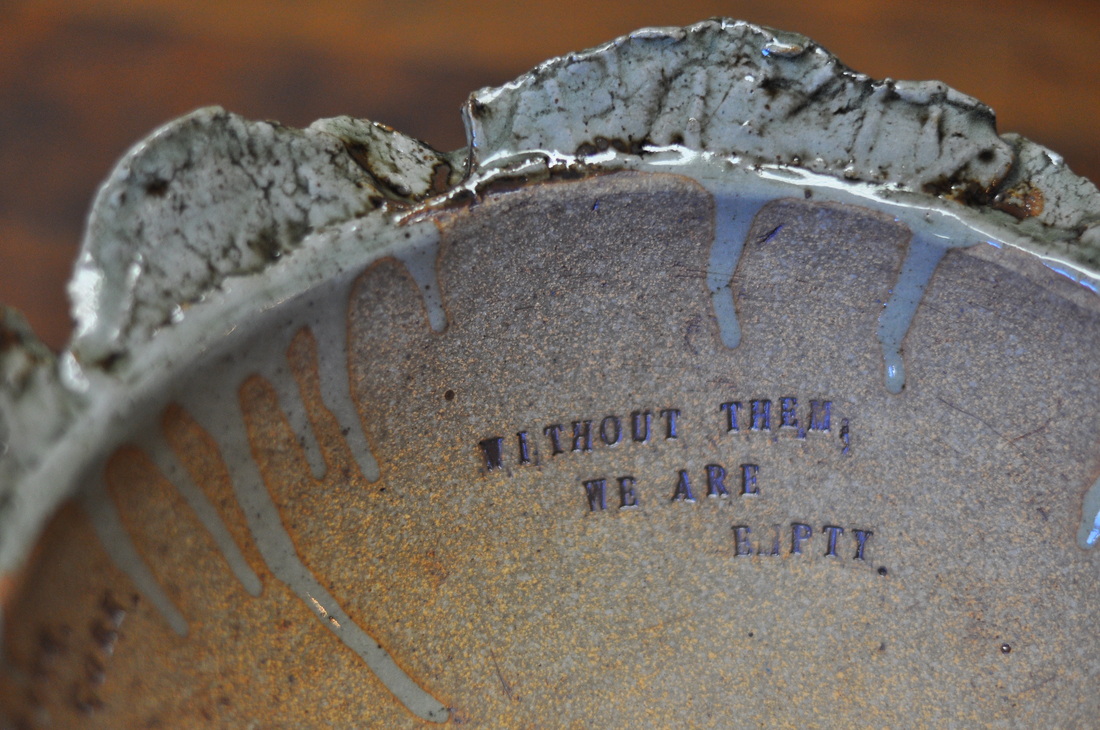
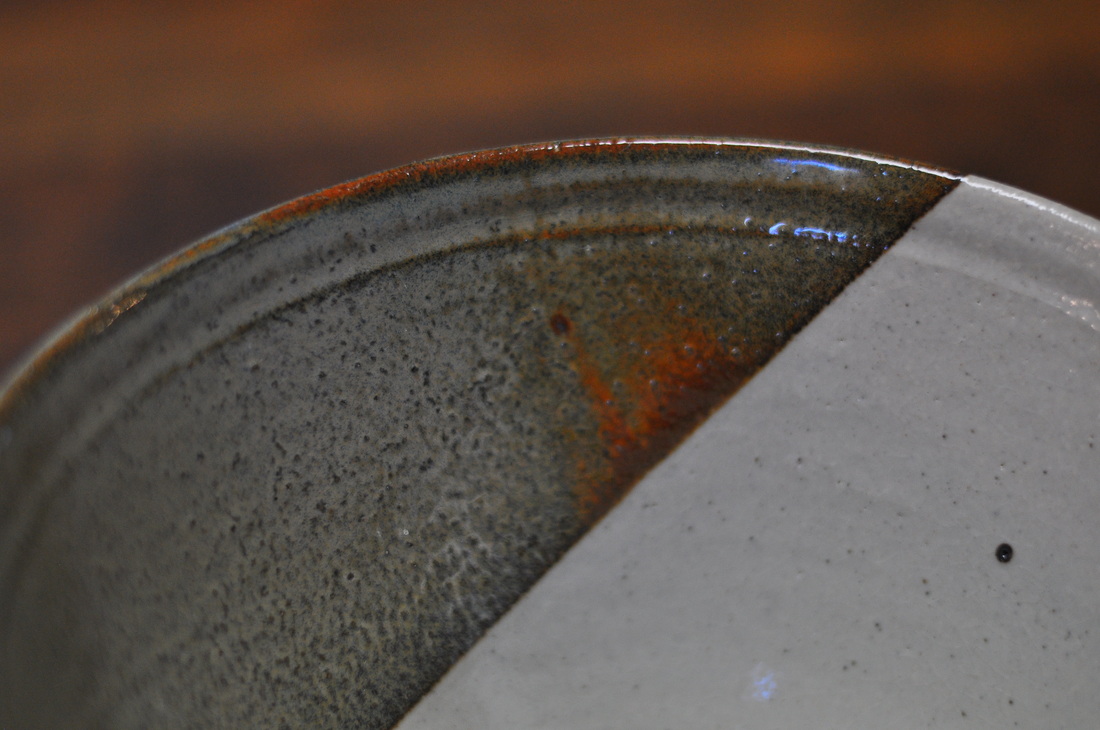
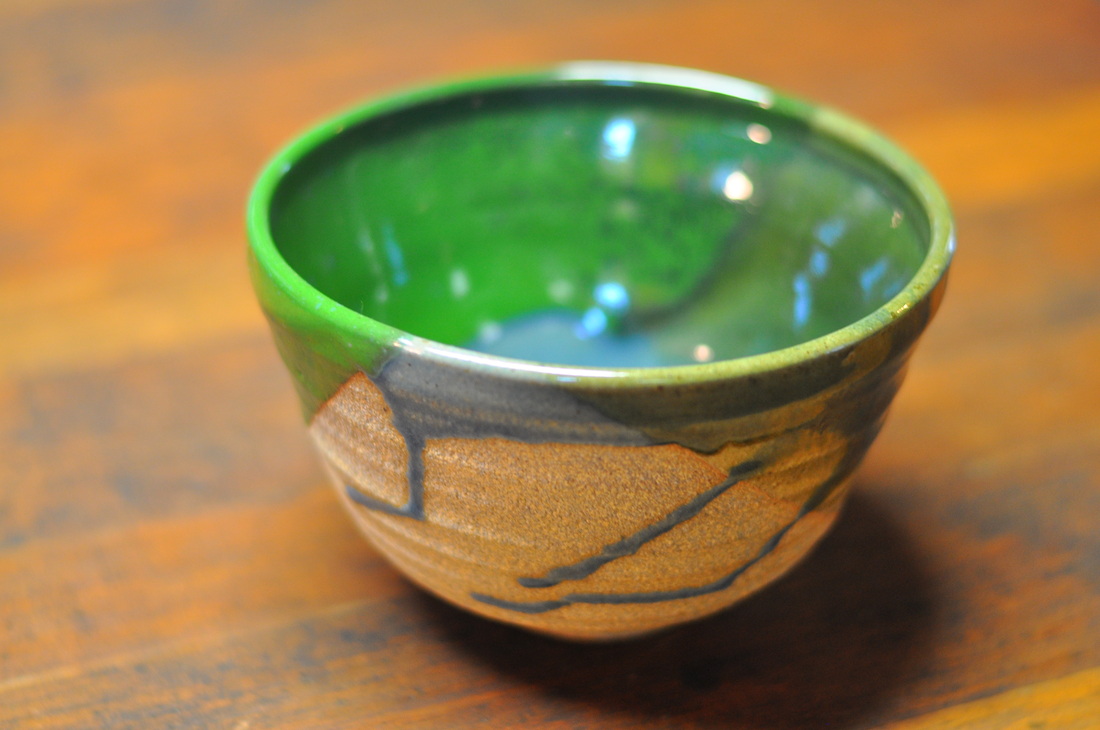
Thank you, as always, for your support of my work. If you have questions or comments, I'd love to hear from you (either via the comments or my email). Kyle My ceramics class finished for the year a few weeks ago. I wanted to share some of the finished pieces with you! I had a good time spending the start of 2013 getting up really early and making the trek across the city to say good morning to the Golden Gate Bridge and to get my hands dirty in clay. I love it because it's so different from knitting and the other fiber arts... A key lesson in ceramics is when making something, you make 2 or 3 (or 10!) of the same thing, and with each one, you learn more. Working in multiples also allows for the inevitable problems that happen in ceramics... like firing mistakes, glaze issues, and cracks. 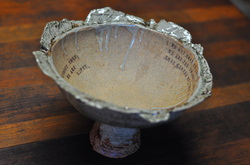 11.5"W x 11.5D x 7.25"H 11.5"W x 11.5D x 7.25"H During this class, I focused on making footed pedestal bowls with these "torn" edges. This one is my favorite (and was also the last one finished. There were (I think) 5 or 6 by the time I finished the course. One was a big failure [lesson?] because there was a glaze problem and it stuck to the kiln shelf. Another turned out wonderfully but there was something in the clay that melted and burned a funny drippy hole in the bowl. (In this program students are provided, and required to use, recycled clay. That means there's often foreign objects in the clay and, from time to time, they make their way into a finished piece.) As you probably know, I'm drawn to text on art. In paintings. On knitwear. And in ceramics. This quote from Daisy Whitney resonated with me and something about it reminded me that I do the things I do (and surround myself with the things I love) because I love them. It's sort of an artsy twist on "you are what you eat." We are what we love. We are the things, the people, the ideas we spend our days with. They center us, they drive us, they define us to our very core. Without them, we are empty.
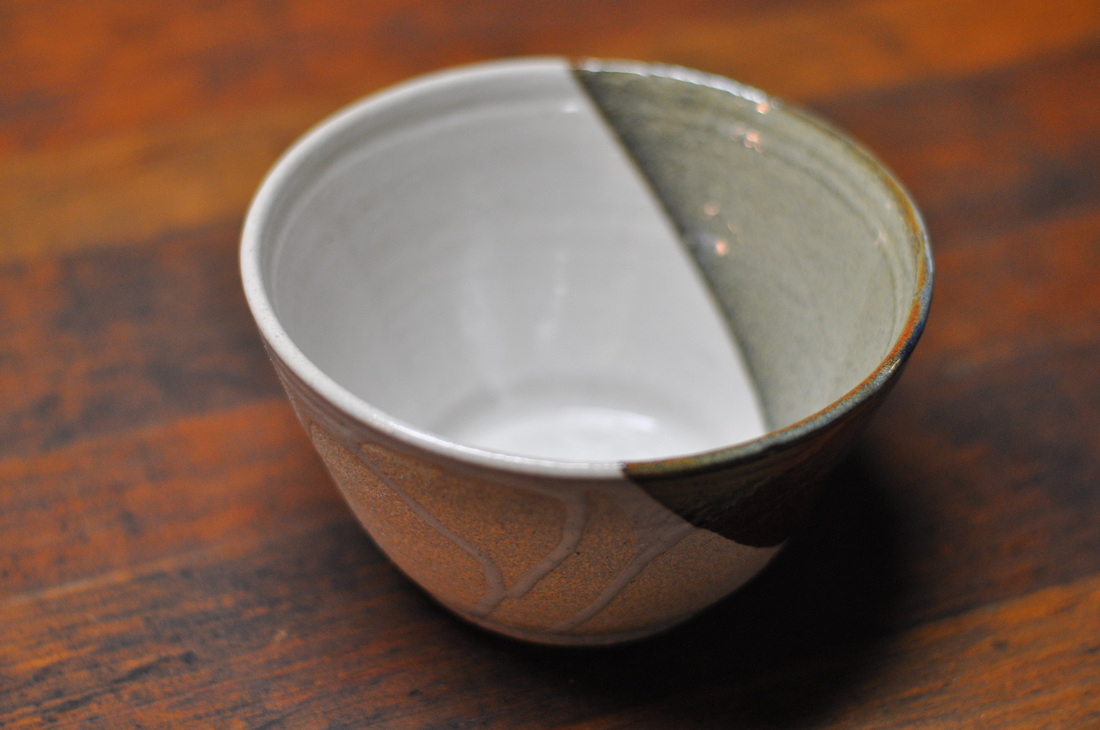
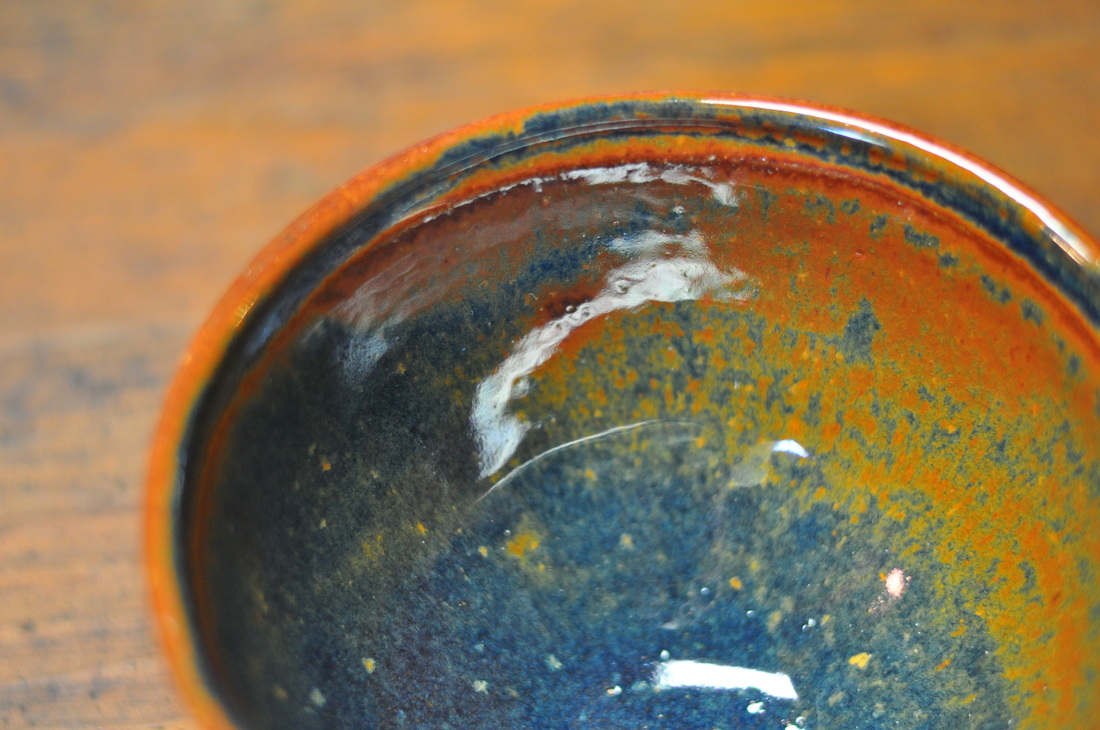
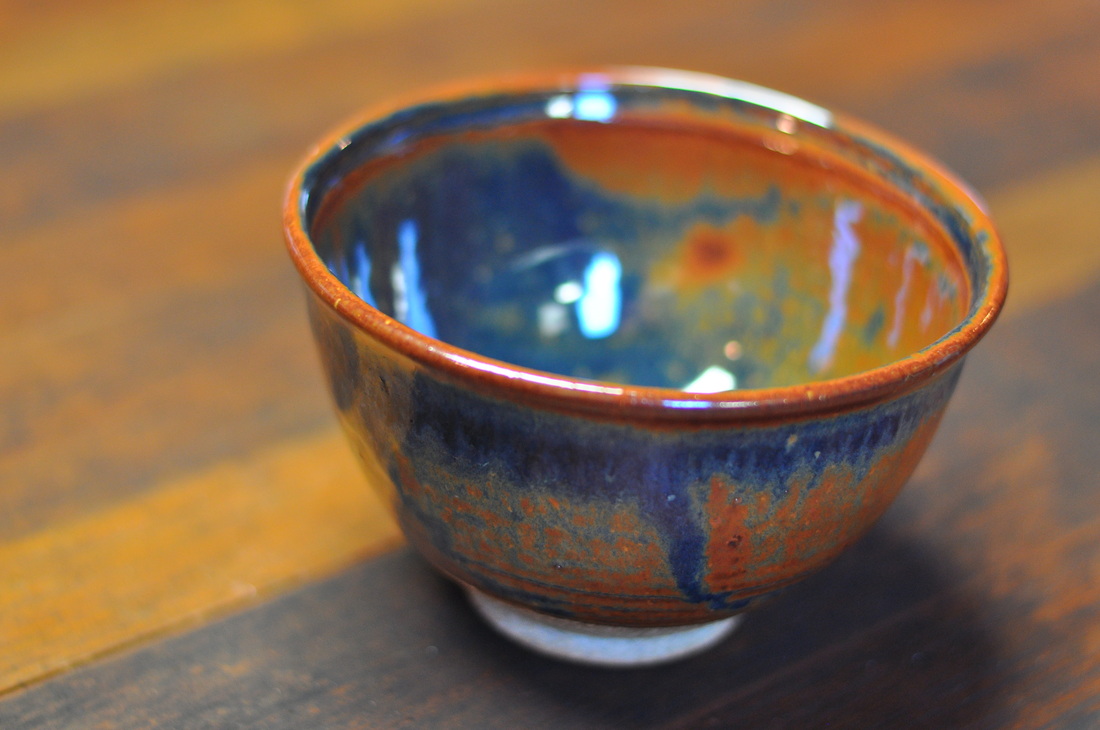
Another goal in the class was to make proper cereal/ice cream bowls. There's nothing like eating out of a handmade bowl. Among my favorites was this one - blue and rust and organic looking glaze over a simple bowl. I am enamored with the wheel, and if I had time and was able to focus, I could spend weeks making hundreds of bowls. This one has yet to be used!
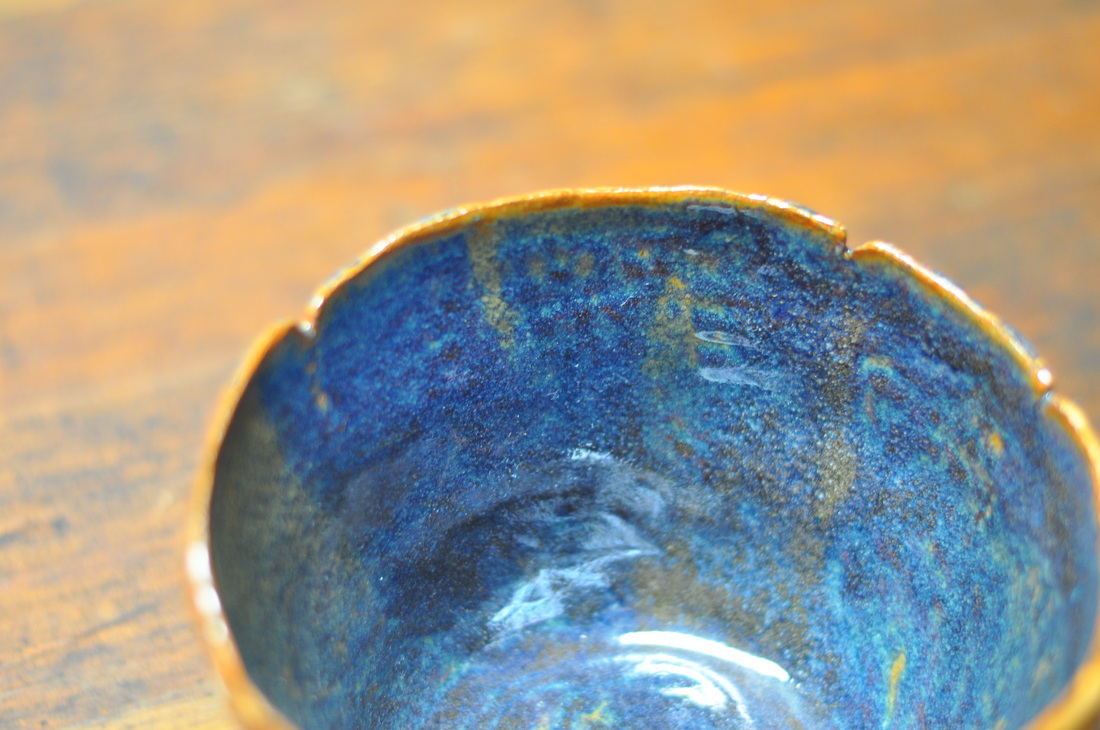
 7"W x 7"D x 4"H 7"W x 7"D x 4"H ...and then, there's this bowl. I was in a mood experimenting with pouring glazes and leaving the outside of the bowl raw. I wanted to show that clay that was making me so frustrated. The interior is smoothe and glazed but outside it's full of drips. One side dipped in a different color allowed for interesting contrast. Mixing glaze on glaze like this makes for unique results. Taking notes and trying combinations over and over gives an idea of what might happen but in the end, the final result is up to the "kiln gods"... I think this bowl might end up living in the studio and holding yarn. It's a nice sturdy bowl with a wide brim and I like how it looks on my old wood table.
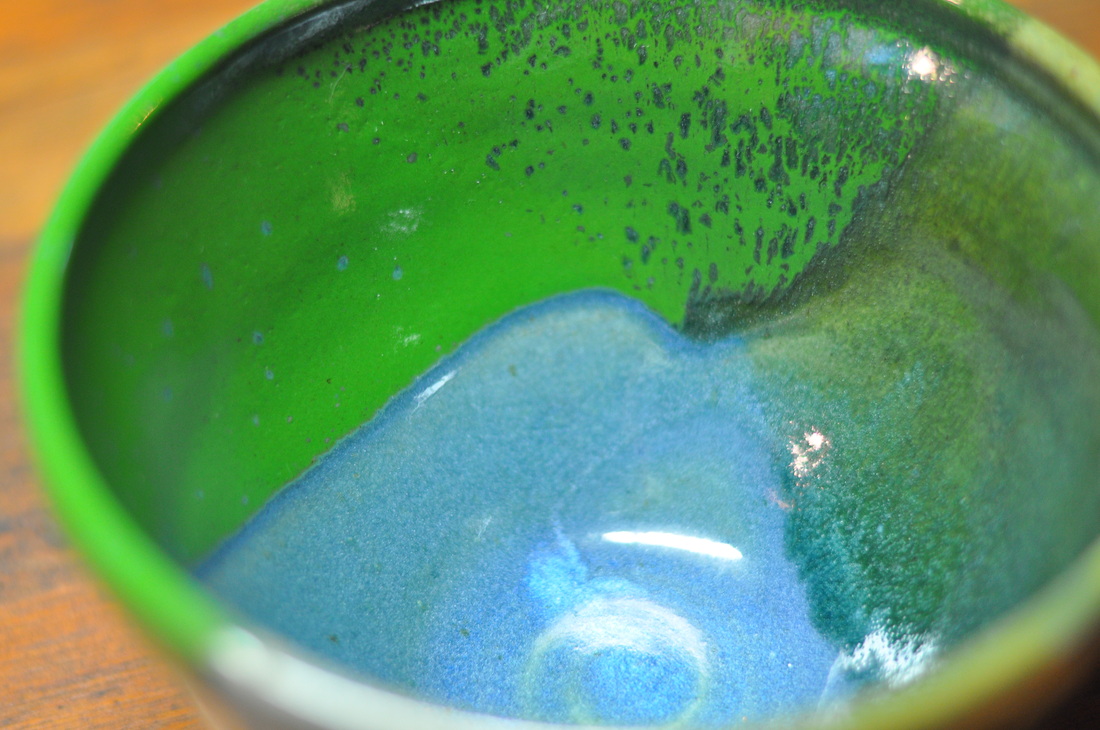
I talked about this bowl on Facebook. 3 colors of glaze poured and dipped on this bowl. the one green got super duper green! - outside it's raw clay again (and I know now it's a bit more rough to the hand that I prefer) but I like the bowl still. Another candidate for ice cream or cereal.
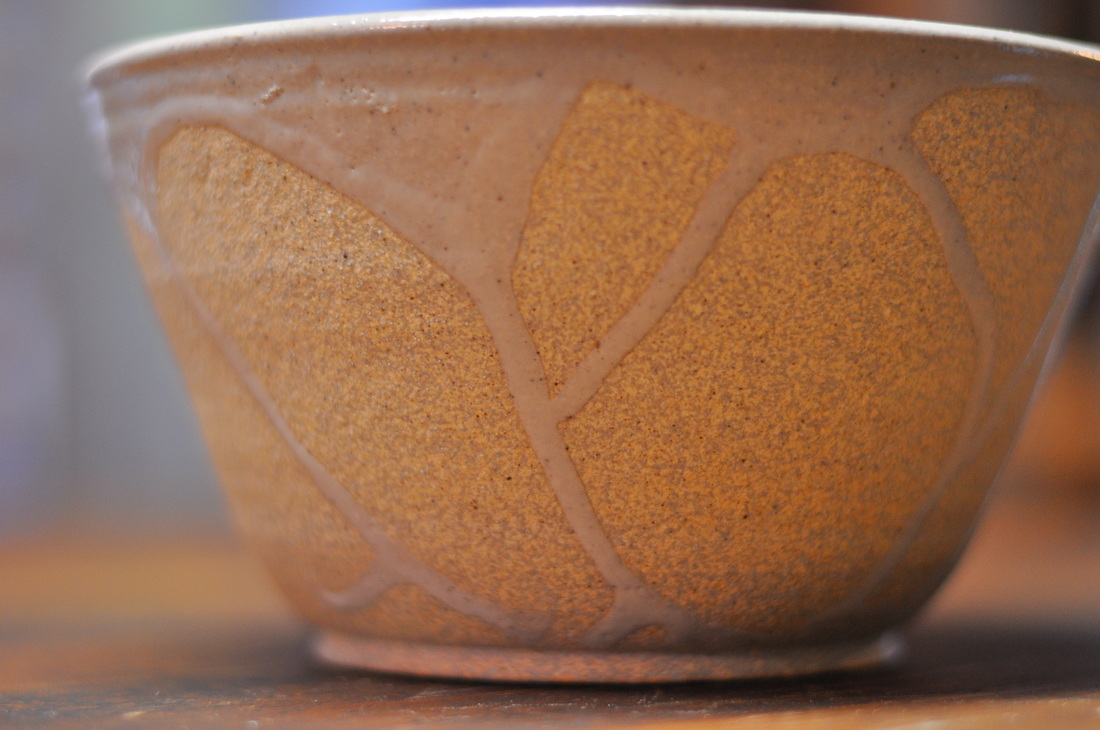
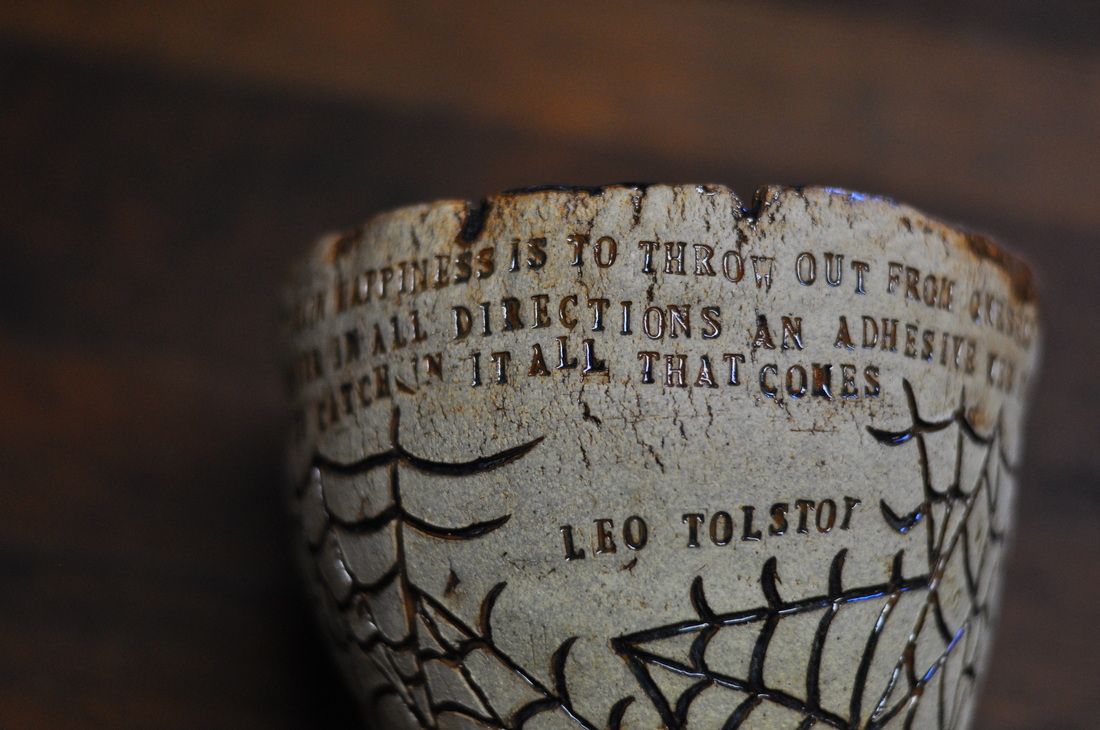
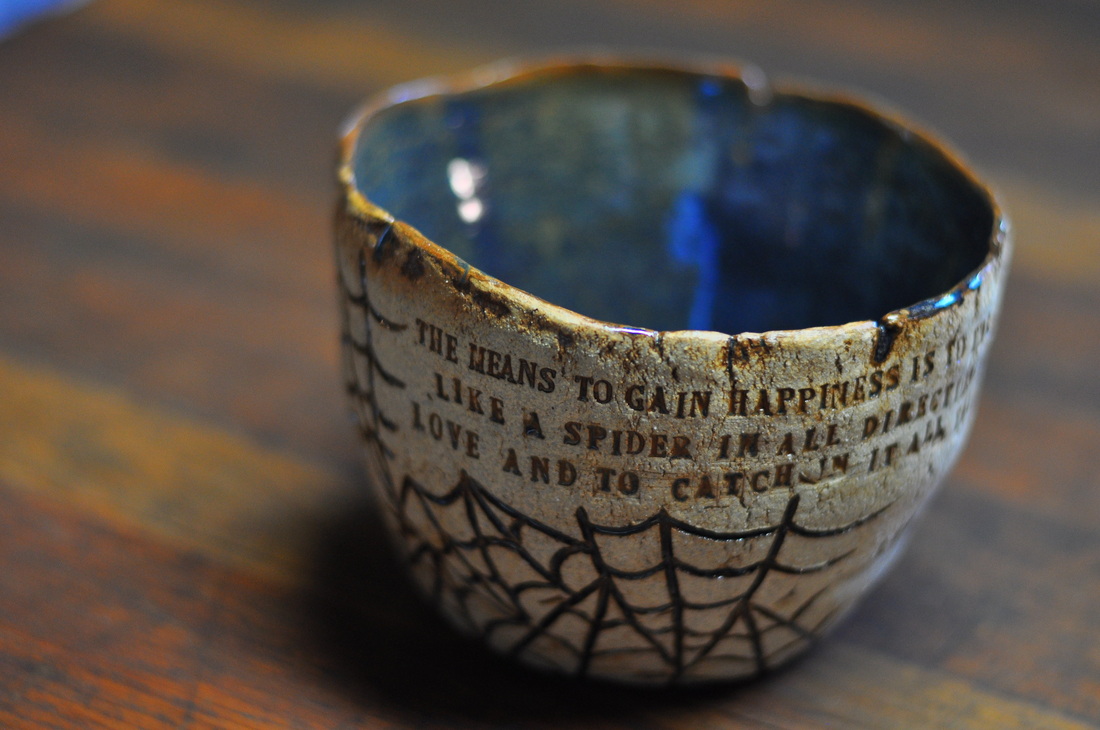 6"W x 6.25"D x 4"H 6"W x 6.25"D x 4"H Going back to the very start of the class, this was one of the first pieces I made. It's also one of my favorites as far as the way the glazing turned out. I carved spider webs into some pieces during this course, much like I did a few years ago when I was doing ceramics in Los Angeles. Then, I used my little letter stamps to impress another beautiful quote, this time from Tolstoy. After it was bisque fired, I dipped the entire piece in glaze, then, after it dried, wiped most of the glaze off of the exterior. A final "kiss" of clear glaze on the rim finished this piece. It feel organic and free. This one might also live in the studio - but I suppose not everything can live in the studio, right?! - perhaps some of these should become gifts.... The means to gain happiness is to throw out from oneself like a spider in all directions an adhesive web of love, and to catch in it all that comes.
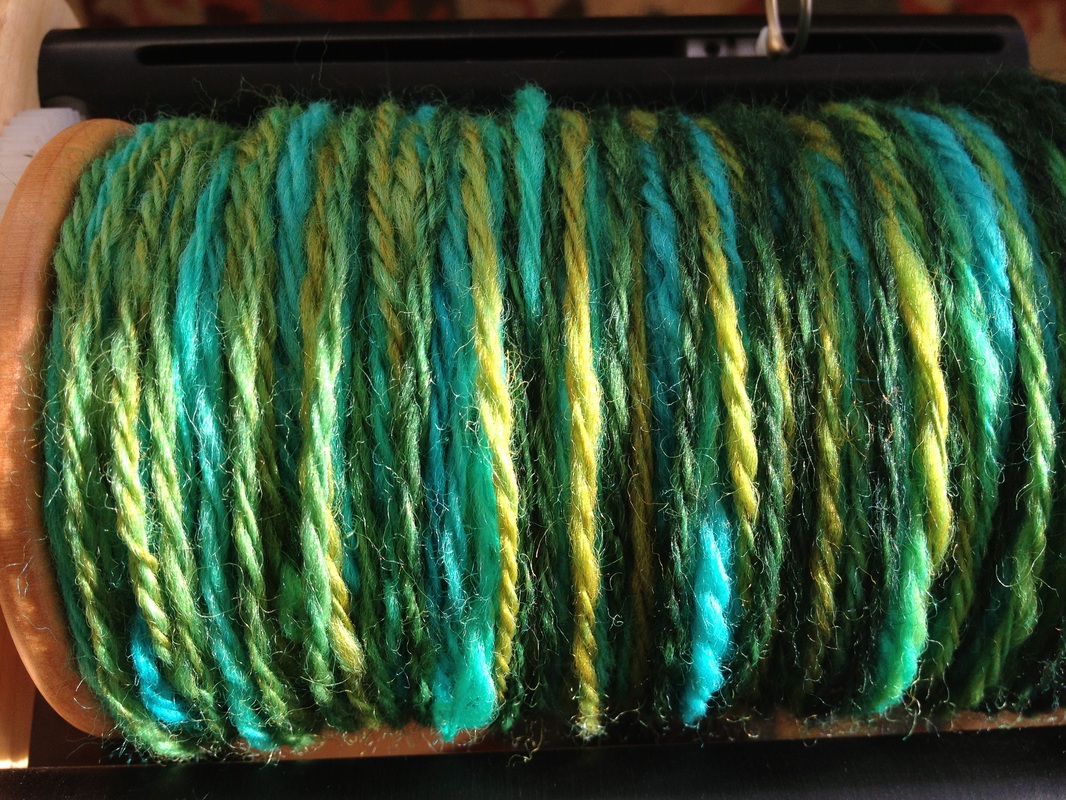
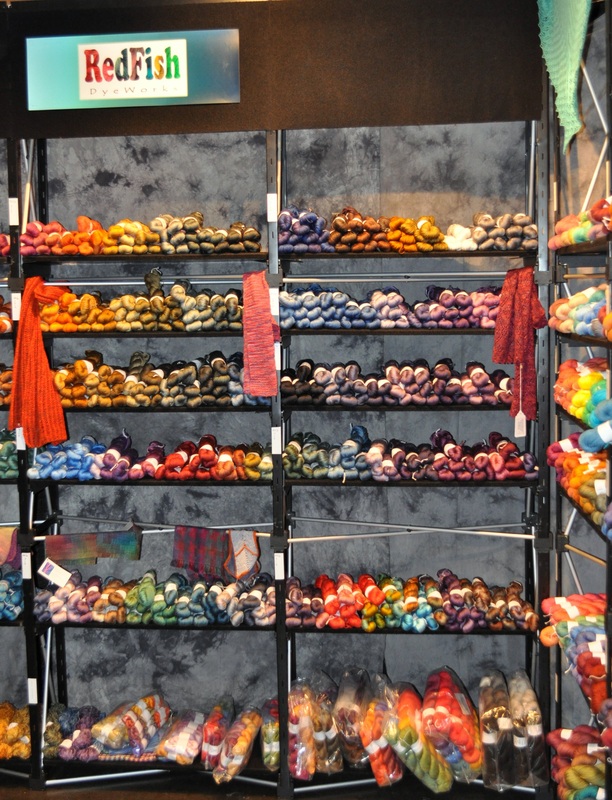
So that's some of the ceramic work I did this year. There's lots more, of course... but these were among my favorites. Class is done, so my tools are all packed away, along with my ceramics notebook; waiting for the next adventure in clay. Shop UpdateToday I listed a few more hand dyed tops - I have grand plans to spend a day or two in the dye lab. Here's hoping for a larger update soon! It's so fun to turn on the music, mix up the dye and spend a day creating color. Perhaps this weekend will bring more time for that! 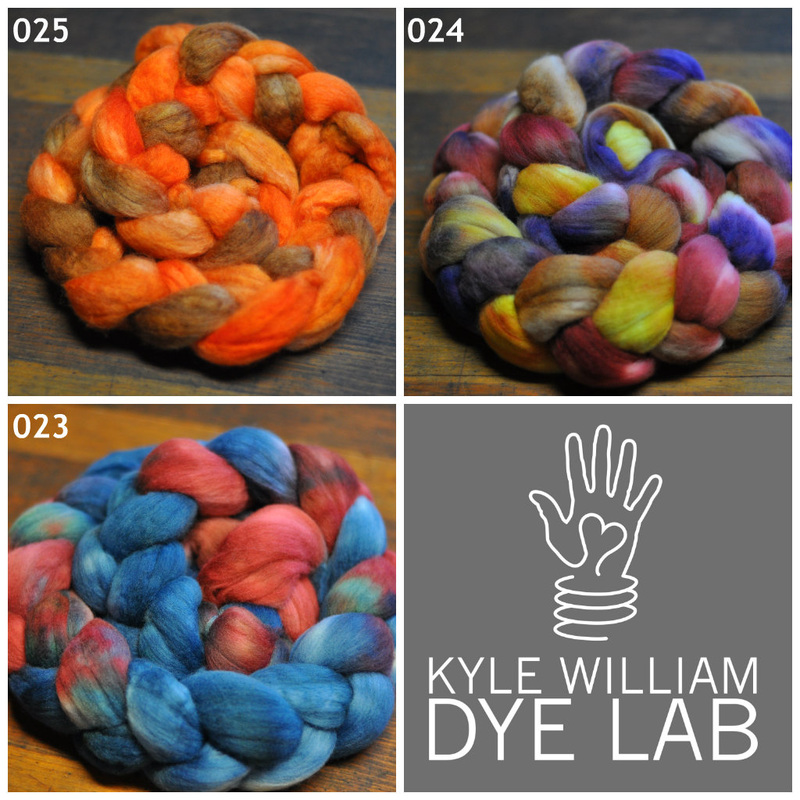 Current SpinningI've spun up one of these 4oz braids made by Lisa Merian of Spinners Hill that are from Trumpet Hill in Albany, NY - I split it in half lengthwise, then spun it and finished by Navajo plying it - making a nice 3-ply yarn. Hank #1 has 102 yards and hank #2 has around 120 yards... I have another braid to spin up and can't decide if I want to do it now or save it for another time....
Current Knitting The knitting I've been working on recently isn't very exciting. yet. I'm busy working on a design that's got me unsure of what it should be. It started as one project (which is complete), then I thought the motif would work better as a different kind of project (which is on the needles)... and now, as I work on that design I think it might need to be something different than THAT... so I'm a bit thrown by that project.
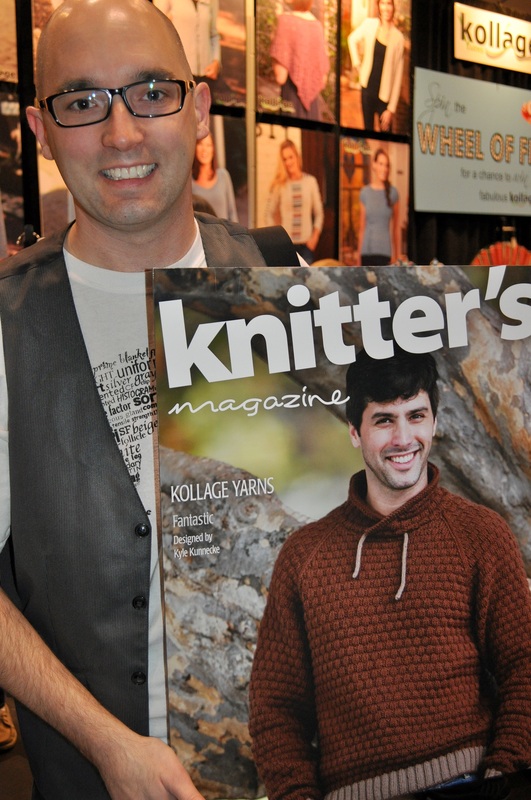
In other knitting news, I've created a few swatches and concepts for proposals and that work takes time away from knitting things I can share. It's work I love to do, though, so it's quite worth it. The only thing I don't like about it is the WAITING to talk about it all! 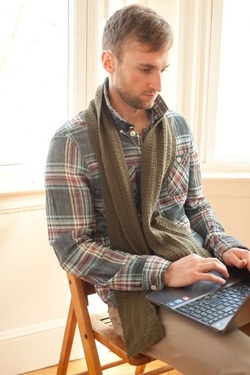 What a treat to be part of the new Quince and Company collection: Scarves Etc. 2013! My contribution, Caden, is a scarf designed for anyone to love and cherish. It's soft, flowing, textured... and the pattern is a gentle repeat that's easy to remember, making it perfect to take along to knit night! As always, the folks at Quince provided beautiful images. If you haven't worked with Quince yarn before, now's your chance. It's available at Quince and Co's online shop, and select yarn shops, including A Verb for Keeping Warm in Oakland, CA! A preview of this and some of the other scarves appeared today on Quince and Co's blog HERE. It feels great to have a piece among the other gorgeous submissions... I am really excited about seeing the final e-book too! I'd love to know what you think of my latest design, and can't wait to see it in different colors of Chickadee. 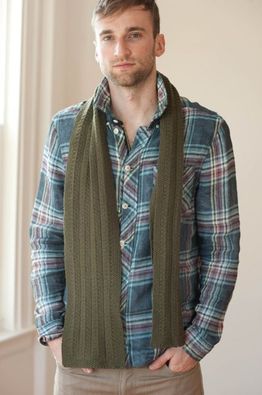  This pattern includes a suggestion for a special cast on and bind off. I created tutorials for each of these techniques and added them to the videos tab of www.kylewilliam.com. I announced the cast on tutorial on February 5, and below, you'll find the bind off video. Working with Quince and Company Chickadee was a dream. The stitches are crisp, the fabric soft, and the final scarf is one that I'm quite pleased with. I hope you'll like it too!
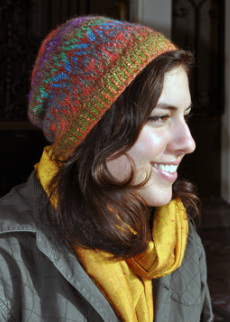 I'm happy to announce my latest hat pattern! Meet Emeline: a stranded hat that celebrates individuality. It begins with 2-color ribbing, blossoms into a engaging chart, and finishes with striped decreases at the crown. It's a comfy, slouchy, stylish hat and is going with me everywhere I go. After the bind off, a wonderfully lightweight hat like this encourages us to venture out on chilly nights. Emeline, comfortable and stylish, celebrates the unpredictable and unexpected adventures of working simultaneously with two skeins of Noro Silk Garden Lite. The pattern, inspired by 18th Century ironwork, is interesting to knit and satisfying to wear. As a compliment to the rigid structure of the chart, gentle color changes within the yarn guarantee a unique hat. This pattern requires intermediate knitting knowledge including: working in the round, two-color ribbing, reading charts, simple stranded color work and decreasing, all on double point needles. 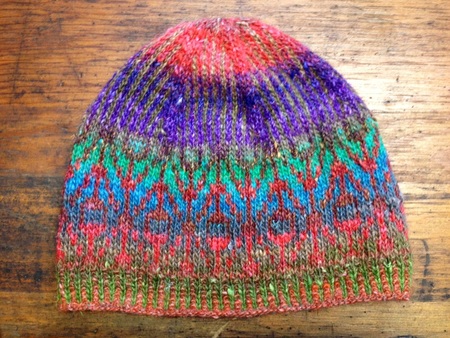 The "Emeline" hat by Kyle Kunnecke So, Emeline is available on Ravelry and in the Shop. I hope you enjoy knitting this one; it really is a rewarding project! Now that Emeline is completed, I can get to work on some of the other fun things I have in the works. There are so many good things happening right now, and believe me when I say it pains me not to talk about all of them. All I can do is ask you to "stay tuned" - In the meantime, I'll continue to keep you updated on what I can talk about. 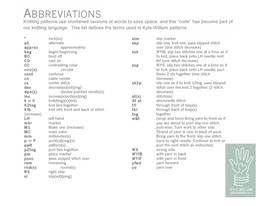 In website news, I added a link to a page of abbreviations most commonly used in my patterns. It'll be updated as needed, and the current version is included with the Emeline pattern. This seems a good way to make sure people are aware of the abbreviations I use, and could also become a good tool for people as they work on other patterns.
So, here's hoping you fall in love with Emeline - if you're still searching for a gift for a knitter, perhaps this pattern along with a gift certificate to their local yarn shop would be loved?  I'm busy in the studio posting scarves and hats and goodies in my Etsy shop - and thought I'd send out a quick blog post (as promised) with the image of the finished clasped weft scarf. This one is going up right now and will hopefully find a lovely home for the holidays. It also features the (fairly new) Kyle William labels - I LOVE my label and my logo... I hope that the recipient loves this scarf as much as I do! **UPDATE** This scarf sold within minutes of being posted. Hooray!  As with all my postings, I offer free gift wrap and a card if you are purchasing to send to someone via mail.
There's not much time left for online holiday shopping without paying lots of shipping costs - so I better get back to uploading and posting these items in case someone wants a fun finished fiber project as a gift! Happy Holidays!
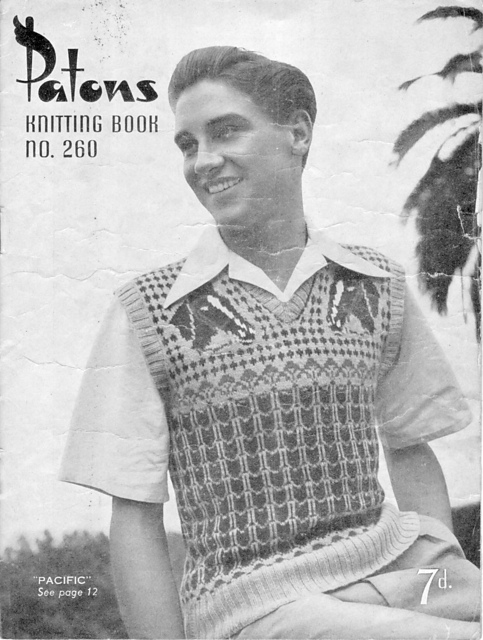
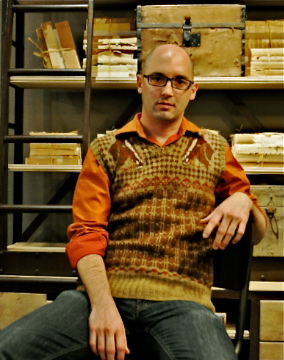
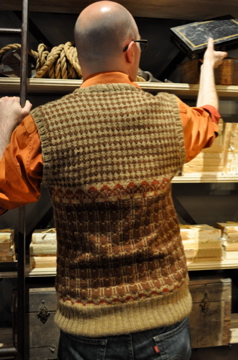
Where was it in the making that I realized this vest was not going to fit me? Honestly, probably about 2" into the pattern. It was too small. By a longshot. I kept trudging along, though... mezmerized by the patterning and thinking, "it's ok; it'll block out". Seriously. I was finishing up one of the intarsia horse heads as I finally came to my senses; this wasn't going to fit. No matter how much I wanted this gauge with this yarn, if I finish it, it'll be beautiful and too small... so if I really want to wear this horse vest, then I must rip. it. out. So, I did. Then, the next day, I started swatching again. I found that I really needed to be on US 5 needles (yes, 3 sizes up!) It was going to work this time, and started to re-knit the vest from the beginning. 
Do I feel bad about ripping out all that work? Not really. It was frustrating, but in reality, exercises like this are helpful. Working a "large" swatch (i.e. the front of the vest!) helps me to study and understand the pattern. In this case it also helped me figure out the quirks of the vintage pattern so that when it was time to do it over, I knew what I wanted to change.
The thing about a vintage pattern is that the wording is different than in more modern patterns. Sometimes, working through one feels a bit like decoding a word problem! The details can be different too, like the ribbing length at the bottom of this vest. I actually like it - it's fun and true to the design and its era.
I have worn this vest a few times now... to work, and around town. Not one person has asked me if I knit it. I don't know if that's a compliment or not! I LOVE my horse vest and look forward to casting on for my next project! For those on Ravelry, here is the LINK to this project's page. I had the opportunity to do a commission project for a New York based video producer. The project essentially was to create a knitted cozy to go over this piece of electronic equipment. He thought it was ironic to use something as traditional as hand knitting to create a cover for something so high tech. I started the project by doing some research. I wanted to learn what exactly this thing was... how big was it? What is it used for. That search brought me to YouTube where I discovered a few videos explaining the product. After a while, I realized that it was something to do color correction for video post production... I learned that it's a very expensive piece of equipment, and finally, I realized I am thankful that I don't have to learn how to use it! My job was simple: create a knitted version of the station. 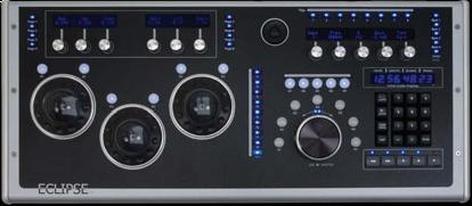 It took quite a whie to make this piece - using US2 circular needles and playing with charting software to come up with the proper layout for the piece. In the end, I decided to be somewhat realistic with the cozy while keeping it whimsical. The end result was a fun cover that will do its duty for years; covering this expensive piece of post production equipment. 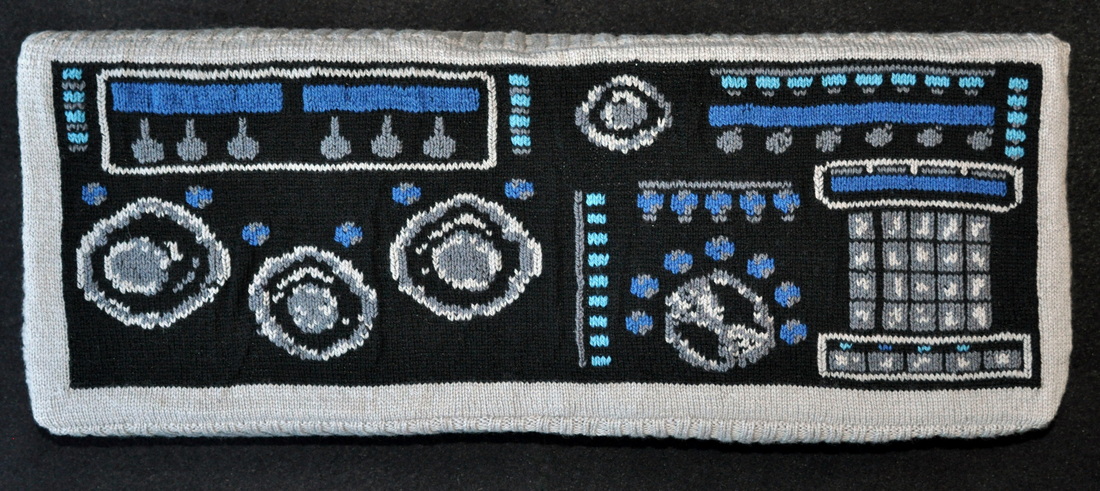 The face of the cover was knitted flat, from side to side, and then I picked up the stitches around the face and knit ribbing to create the sides. The design was duplicate stitched onto the background and, in the end, I'm pretty proud of this cover. If you'd like to view or "like" the project on Ravelry, here's a LINK to it's project page. I'm looking forward to the next fiber-related challenge!
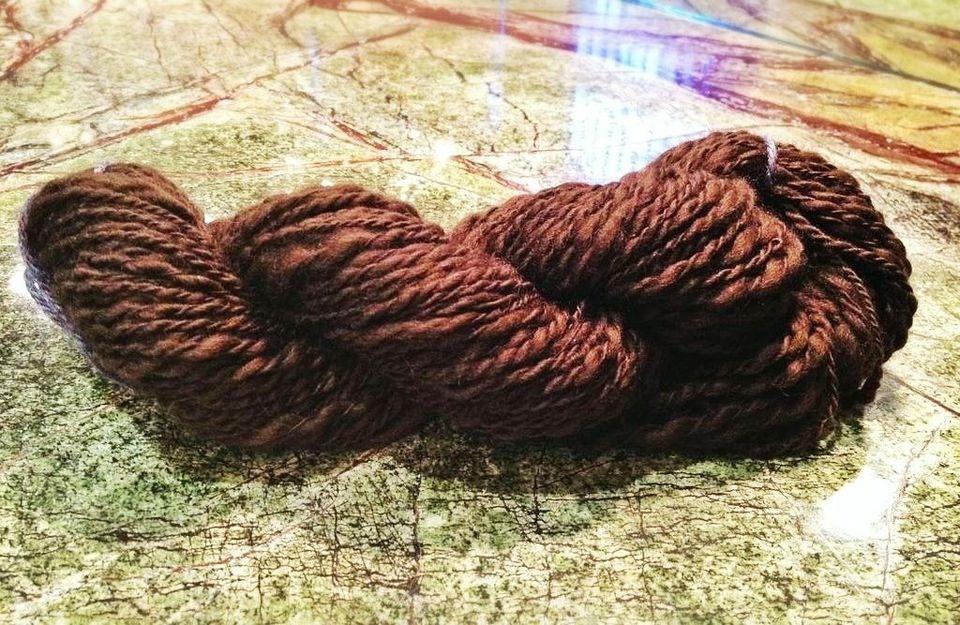 ...OK maybe it's not a superpower but what else should I call the ability to turn fluff into YARN?! I'm intrigued at the process and it's like watching magic!! Still very much a beginner, but I LOVE my new wheel! As some may have read, I bought a Schacht Sidekick and I have been working on it a little each day. The wheel just hums along and I am pretty proud of my first hank of yarn! It's some mystery wool that Purlescence Yarns gave me to practice with... and while it's a bit thick and thin, I think it's respectable as a first attempt. I have been wondering why I want to learn to spin. When I first tried a few years ago, I decided I wasn't ready... after all, I can buy good yarn already made commercially (or even other people's handspun!) so why would I spend my time making yarn when I could spend it knittng. Then, it hit me... this is the SAME argument people make about knitting. "Why would you knit something by hand when the yarn is expensive, it takes a long time, and you can buy something commercially made that also looks nice?" 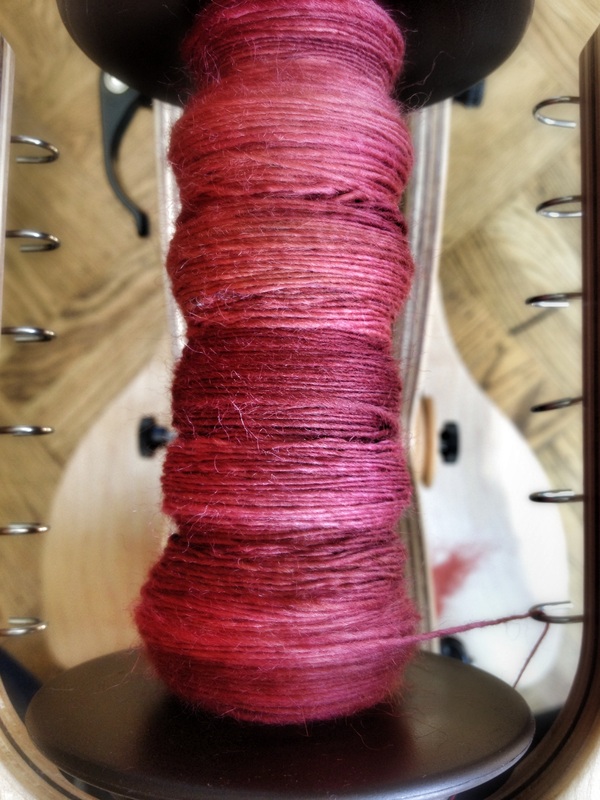 So... I get it. Spinning is like knitting. It's meditative, creative, inspiring, and putting time into making yarn adds to the beauty of a hand knit (or crocheted or woven) project. As I get better, I'll have more opinions, I'm sure. I spin because I love to spin. it feels good to have produced the yarn and I am sure that when I knit with my own handspun, it'll make my project even more special. This photo is of the 4th attempt (skein?) of yarn I'm working on... my singles are more even and it's moving along nicely. This fiber is produced by a woman in Bainbridge, NY and I'm really intrigued by the way the colors are shifting. It arrived as a dyed braid and I split it up and am happily working my way through it now. 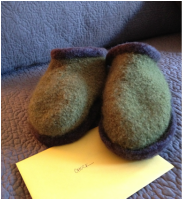 In other knitting news, I made a pair of felted slippers for my friend Chuck for his birthday. He loved his last pair so much that one of them wore a hole in the sole - and while I could have felted a patch onto the bottom, it seemed like he deserved a new pair. So, he gets a new pair! These were made with stash yarn from Elann.com (the green) and 2 hanks of cascade 220 - one brown and one grey. The yarn is held doubled for this pattern and they're a pretty quick knit. The rows are long, with lots of wrapping and turning to do the shaping but I love the pattern. I felted these in the front loader washing machine too - just stick them on "hot" and put some dryer balls in the machine for agitation and let it do it's thing... I check them every few minutes and when they're about the right size, I put them on the rinse and spin cycle, then toss them in the dryer on tumble for a while until they're almost dry. A bit of shaping and a final air dry and they're ready! 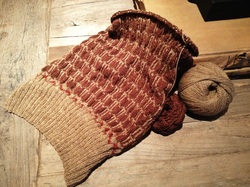 My other work in progress is a vintage vest that I'm feverishly working on, hoping to complete it in time for the Men's Spring Knitting Retreat coming up in May! I have *almost* completed the front (it's done with the exception of weaving in ends, and the final details) and I am almost to the armholes on the back. It's coming along nicely but if I want to get it completed I have to get to work on it! There's just so much to do!
Which means, I guess, that I should get to it! Have a fantastic week!
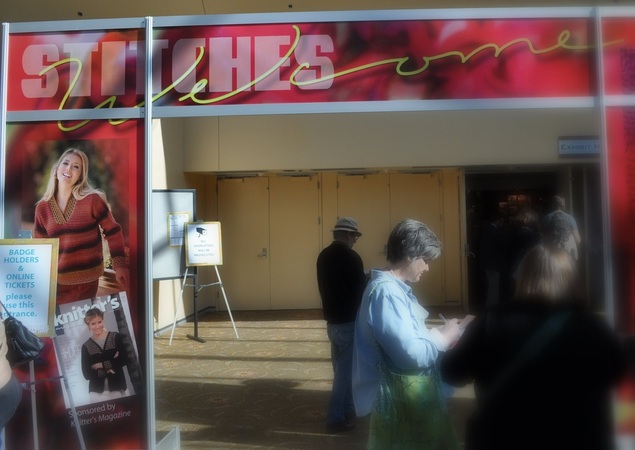
Stitches West 2012 inspired... as all Stitches events before did. This year, everywhere I turned, we were coming across a designer, yarn manufacturer or publisher and it felt really good to be surrounded by such talents. I look forward to the next event where we can all get together and share our passions. Congratulations to everyone who worked so hard to put on such an amazing event!
These were finished back in September but I am just getting around to posting and talking about them! They were part of my "self imposed sock club" where I was going to knit a pair of socks every 2 months while still working on other projects.... it didn't work out the way I thought it would; I did get some socks knit but even with this added pressure, I still couldn't convince myself to knit socks! Oh well.. the "sock club" is still waiting for me.... for the next time I want to knit socks. (I have paired my sock yarn and patterns together in a bin where they wait for me to cast on!) The pattern is the Waves and Piers Socks by Charlene Schurch and Beth Parrott. It's a fun and easy-to-do pattern that I would recommend (and would certainly knit again!) 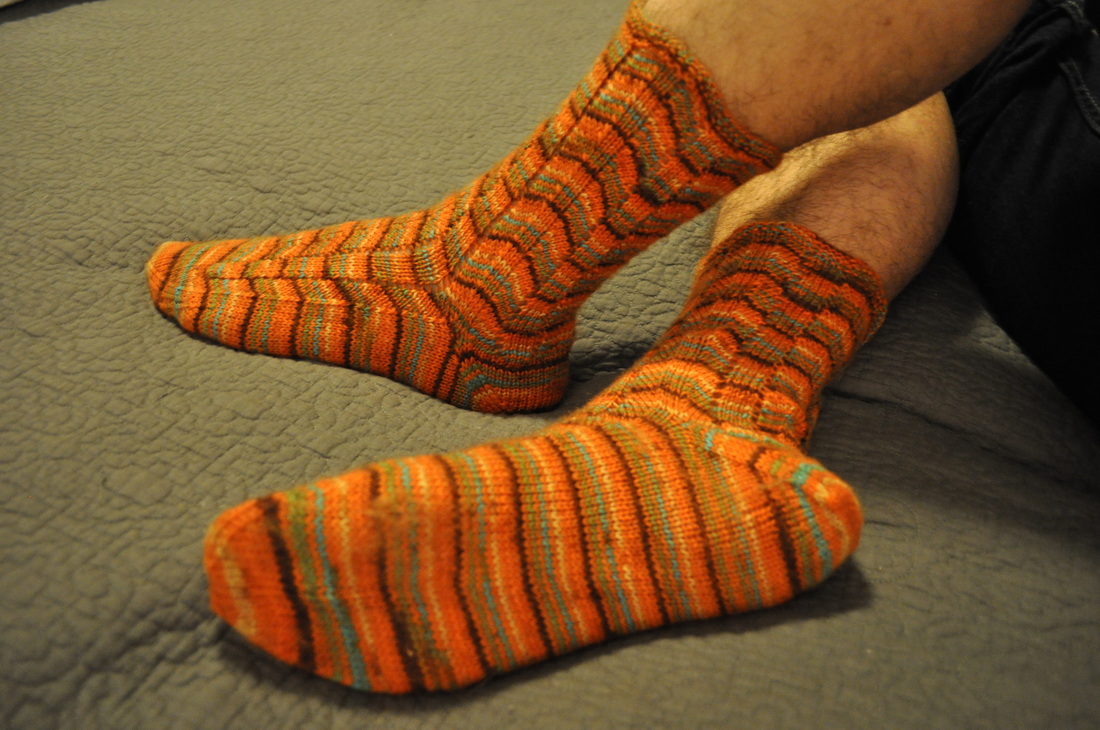 I purchased the yarn on a trip to Webs in Northampton, MA and while I liked the yarn coloring, it sticks to itself and is felting as it's worn (it's 75% wool / 25% nylon). The yarn has since been discontinued, but self-striping yarn is PERFECT for this pattern! Waves and Piers was fun and easy to knit - To make sure my socks were the same size, I made notes for the number of rounds I knit on the first sock for each section, then as I knit the second sock I just cross off each round as it is completed. Overall, I'm pleased about the finished object. And of course... Willow wanted in on the photoshoot action! Check the other details of this project HERE on my ravelry page. 
|
Archives
July 2023
Categories
All
|


 RSS Feed

|
ExploreFor Fun
|
Support |
Connect |
© 2006-2023 Kyle William. All Rights Reserved.